Raising Jenny

Friday, February 28, 2014

I've seen some really cool Jenny Lind bed's popping up (both antique, refinished, and new) and knew I had to have one for my guest bedroom. Of course, for antiques, its not like you can just go make them magically appear...  Definitely not. I could not find one Jenny Lind bed anywhere near me. I also found a really great one on Land of Nod (here), but I couldn't justify spending that much money on something I could eventually find for much cheaper. 

Aren't these beds so cute?
(source


Anyway, I searched local resale stores and Craigslist (cities near and far) for several months. FINALLY one morning I found one! The seller was in a city about 50 minutes from my house. I cancelled my night plans, and begged the seller to hold the bed for me. (I told her the bed would be going to a great loving home! I would take care of her (Jenny)! Overkill for sure but that is typical me). The seller was a nice lady herself and said this bed has been in her family forever.  Long story short, I got the bed.

 It's hard to tell from the picture of this headboard, but it sits pretty low (only 38" high). I am pretty sure that these beds were used (and are still often used) without box springs. I personally prefer HIGH beds.  This one without any changes would just be too low. My box spring/mattress combo would give me about 4 inches of headboard peeking out, which doesn't work for me! So in true form, I set out to make some changes to the bed. I drew this nifty diagram of what I wanted to do.

I also found a random headboard at the local Habitat Re-store that had side posts with the same dimensions so that could use those to extend the height of the headboard.

Then I realized that I have literally no tools or skills to complete such a project and no time to learn how. Luckily, I was able to find someone more skilled with wood and saws to help me out (I hired a handyman). The project is currently under way, and will hopefully be done soon! He spent three hours cutting the wood. He used an "S" shape cut instead of a straight across blunt cut, and the pieces are secured with wood glue and will be screwed together when that dries. 

I can't wait to post pictures of the finished product!

Holding myself accountable (1 year later?!?!)

Thursday, February 20, 2014

Wow! A lot has happened since my last post. Lets see... I studied for the bar exam, took the bar exam, started work clerking for my firm, found out I PASSED the bar exam, became a lawyer, bought a fixer upper (kind of--parents own it), and have been crazy busy. Working out? It has taken a backseat. I'm afraid that while I'm getting adjusted to my job, I am unable to have the freedom to really focus on exercise and enjoying my time working out. That should not stop me from finding some time to get workouts in though. My friend Jen (who I've talked about on this blog) and I are both at a point where we want to start getting back to running and being fit. We followed the 10k running plan last year almost to a T, so we decided to make a get fit 11-week workout plan. This is based off of the 10k plan, takes into account our busy schedules, and has a new focus on cross training and weights.

Without further ado:
I hope keeping track on this blog will help keep me accountable in my path to working out more :) I've been doing a few things this week, but the real plan starts on Monday of next week. If you are following along, I will post a key for the things that aren't clear, like "Wed Weights." Those are going to be decided week-of.

Waterlogue'd

Wednesday, February 5, 2014

I downloaded a new app on my iPad and just wanted to share how awesome this photo looks! :) The app is called Waterlogue, and it's $2.99 for Apple devices. It looks like a real watercolor! Can't wait to play around with the app a bit. I might get a print of this one and hang it in my office at work. 

Dining room transformation

Monday, January 27, 2014

The dining room renovation is nearly complete. It is not yet decorated, but that part may take awhile. The dining room took forever to get finished because not only was there water damage in the ceiling that needed fixing, but there was also a set back where we had to take down the ceiling to change the pipes to be up to code. 


BEFORE:
These two pictures are from when we first got the house; untouched color and everything.


DURING RENO:

It became clear that the ceiling would need major work. It was wavy, cracks, uneven--just bad. My dad took on the project himself (I helped here and there where I could). We also traded out the old knob and tube electric for modern electricity ;)


After we got the ceiling drywall up for the second time, it was time to mud the drywall and paint. With the holidays, this project took longer than expected (common theme?) and so this was the view to the dining room for awhile.
The place was sealed off and paper on the floor. I think the dining room had paper on the floor for... 5 months? It was a long and never ending project

AFTER:
Over the past two weeks, we finished painting the room and hung the chandelier. The room looks great. I spent some time cleaning the floors too.

Decorating has not really started yet in this room and I think it will be awhile, but it's nice to have somewhere to sit and eat!


Laundry room (before)

Wednesday, January 15, 2014

The title to this post is a little deceiving because there is no "after" yet. The laundry room is completely in the "before" stage. I know better than to jump into a million projects a once... but this laundry room can be spruced up quickly and for cheap in my very honest (and very OVER this room) opinion. So here is the tour of the lovely room. 

Entering the laundry/utility room, you see a cinder block wall, a bunch of old pipes, insulation, and dirt!
 I have all my stuff shoved to one side of the room because the other side literally has dirt on the ground.. Can't clean it till I can get those pipes out.

 I bought the washer and dryer myself off of Craigslist. They aren't perfect... a few scuffs and a couple quirks.. but I felt so proud buying them. It felt like my official crossing over to grown-up land. I can't say I like the look of the wood over the window, but my dad says it serves a purpose so I wouldn't want to mess with that!! ;)
 Pipes and dirt.
 This is the wall opposing the washing machine. It is probably my favorite part of the laundry room because it is a fresh slate. After the walls get a coat of fresh white paint I think the place will start looking a lot better. Maybe add art or a chalkboard paint design? Got the indoor-outdoor rug from Marshalls last weekend for $79. Its a 5x7, thought that was a pretty decent deal!

This is the utility side of the room. Besides covering the area up with sheets or curtains, I think I will have to just pretend that this part of the room doesn't exist?

Bathroom update

Sunday, January 12, 2014

The bathroom is one of the most finished rooms in the house (although its not completely done...its use-able and you can get a good idea of where its going).

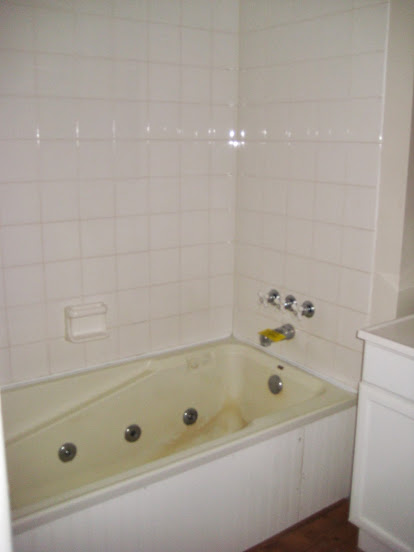
So let's take a look at the "before" pictures. Hole in the wall, old electric, vanity was okay but nothing special, small dirty toilet, and wood planks on the ground covering up layers of chipped up tile. 


There was a jet tub, but it was leaking through to the dining room below. All dirty. White square tiles.

Here is the bathroom now.  The bathroom was completely gutted and re-tiled. There is subway tile in the bathtub, carrara marble 12 x 12 marble on the floor, a new vanity and faucet, new lighting, new toilet, new mirror. The walls were painted edgecomb gray by Benjamin Moore. 


Its difficult to get a good picture in this room because there are no windows in the area, so forgive me for the overblown lighting shots. 

I got the shower curtain from West Elm. I am really liking it!


It's a small bathroom but it gets the job done! This is the only room so far that we've hired help for. The reno is going slow, so we decided to hire a local guy to do the tile, and he did a great job.

Entryway design board

Friday, January 3, 2014

I created a design board for what I am thinking I want my entryway to look like. 
If you have read any of my other posts, you may have noticed that I post a lot of design ideas but relatively few posts about the design actually implemented. Why, you may ask? Not really sure. I'm coming to find that getting the look that I want is really expensive. Even if I buy things that are deeply discounted!  Also, my house is still unfinished. There is crap.everywhere.seriously.everywhere. And dust! And bags from unpacking! Nothing is even close to being finished. Also, real life tends to get in the way.  

My goal for this weekend is to get some of these things if I can find them, to clean up and unpack more, and to take some pictures!
 
template design by Studio Mommy (© copyright 2015)